Showing posts with label creating. Show all posts

Tuesday, December 17, 2013

Boys {Christmas} Bow Tie Tutorial and Pattern

I have wanted to make my boys ties for a long time, but up until this point have only experimented with the long tie. Then Christmas came and I was prepared to invest the time to learn. Using a combination of three rectangles and a square, it couldn't be easier.  My instructions are below. ~Julia


Boy’s Bow Tie

Cut: You will have a total of 4 pieces

Collar

1. Measure around the neck and add two inches. Total Inches_________.

2. Width is 2 ½ inches.

6 months to 2 years

Top Bow

1. 6 inches long.

2. 2 ½ inches wide.

Bottom Bow

1. 7 inches long

2. 2 ½ inches wide

Center Bow Wrap

1. 2 ½ inches long

2. 1 ¾ inches wide

2 to 6 years

Top Bow

1. 7 ½ inches long

2. 2 ¾ inches wide

Bottom Bow

1. 8 ½ inches long

2. 3 inches wide

Center Bow Wrap

1. 2 ½ inches long

2. 2 inches wide


Velcro

1. 1 inch long

2. ¾ inch wide

Sewing

1. Fold each rectangular piece of fabric that you cut with right sides together and sew lengthwise.

2. Press each seam being careful to only press on the seam, not on the folded edge of the fabric so you don’t create a crease.

3. Turn all pieces right side out.

4. Press each piece with the seam in the middle, so the front shows no seam.

5. Fold bow piece to create a circle and sew a zig zag stich to connect the two ends. If you are sewing the smallest size you may have to sew half and then turn and sew half from the other direction on your machine.

6. Repeat if you have a double bow layer.

7. With the newly created seam in the middle, fold the bow in half lengthwise and sew about 2 inch in the middle lengthwise to create the shape for the bow.

8. Repeat for the second Bow.

9. Hand sew the two bows together.

10. Wrap Center Bow Wrap around the bows and the collar and sew them together. Making sure the center of the collar is sewn under the Center Bow Wrap.

11. Turn Collar ends under and place Velcro on the ends of the Collar. Double check you are sewing the Velcro on the opposite sides of the fabric, so they connect when you’re done.


Use this YouTube video as a reference http://www.youtube.com/watch?v=_Mv84xBXWyk.
I have a couple of areas that I do differently, but overall this is very similar and helpful.

Saturday, April 14, 2012

Love Where You Live


When it comes to the home, I'm a firm believer in learning to be content with what you've got by making what you've got, work! Everyone should love where they live. Get over the things you can't change, and take charge of the things you can. If you hate it, paint it! If you can't paint it... well, then you may just have to live with it (but there are very few things in this world that can't be painted). I love, love, love changing things up and moving things around, cleaning things out and throwing things away. But, I predominantly use what I have and hold onto many items for later use and frequent rotation. There are many things I would change about where I live now if I had the money, but that doesn't change the fact that I truly do, love where I live!


There are very few pictures hanging on my walls, decorations sitting around or furniture being used that I have not owned since childhood, were hand-me-downs from other family members or have been picked up on the side of the road! If I don't like something, I'll spray paint it, switch out the picture, replace a picture with scapbooking paper or material, etc.


I love surrounding myself with colors that make me happy and bring me enjoyment. Don't put something on your wall just for the sake of putting something on the wall. Hang it if you really like it, and if you don't - spray paint it!


Find enjoyment and beauty in the natural decorations that God himself has supplied! I love the bright colored forsythia bush outside the dinning room window, and the colors in the oak tree as it comes into bloom. If you're having a hard time seeing the beauty outside, maybe it's time to clean the windows! (No, really, clean your windows. It's crazy what a difference it can make.)

~Sarah

Saturday, February 11, 2012

Quick Table Runner

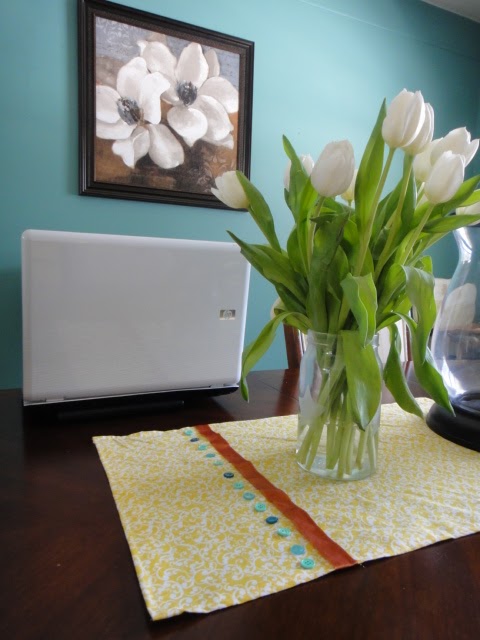
I bought some pretty yellow fabric the other day for $1/yard and have been thinking over what I would use it for. Don't get me wrong, I love sewing, crafting, creating, etc. but if a project takes me longer than an hour to bring to completion, well, then it just seems like work! I love quick things that are fun to make and rewarding to look at! For this table runner, all I did was cut a piece of fabric to the size I wanted (didn't even measure, just "eye balled" it!!) Hemmed the edges, then used a hot glue gun to add the ribbon and buttons.


These just so happen to be my Valentine's day flowers - hubby was with me at Costco the other day and asked me to pick out what I wanted, rather than wait till they went up in price the week of Valentines day! Romantic, huh? Well, it worked out because now he knows I would rather have white tulips over red roses!


I'm enjoying the view of the tulips from my "workstation" - aka my lap top and sewing machine, currently occupying the dinner room table.

Wednesday, February 1, 2012

Lima Bean Wreath

I have seen so many of these super cute wreaths pop up on Pinterest. I had also seen the idea to use a piece of pipe insulator foam to form a wreath base. So, here was my endeavor to make one of my own! I think it turned out pretty cute, but in no way perfect... there are several things I would do differently next time.


I bought this 4 pack of pipe covers which cost 2.97, the lima beans cost 2.88 - I had black duct tape and a glue gun already, as well as a left over can of spray paint. I only used one pipe and half the Bag of lima beans. My husband and I put the kids to bed at night and usually sit to relax for a couple hours with a movie or show. Many nights, you will find him sitting on the couch while I sit on the floor working away on my projects! This project was completed within the time frame of one, hour long episode of Alcatraz :)


I wrapped tape around the two ends to secure them together. Works pretty well! The only thing is... it was hard for me to get it to stay in a perfect circle, it is slightly deformed for my taste! All I did was glue the beans on in random order. The part I would be more careful of in the future, was strings of glue being left behind. Only if I will be painting it again, the spray paint clings to the glue strings and looks a little messy. I have seen these wreathes left unpainted, just the natural color which looks cute too!


Hang with a bow and we're done! I will be VERY interested to see how well this holds up, if the beans fall off or crumble, or if the birds eat it! I am thinking the spray paint will hinder them. I am just very happy to have something new up, since before this, I still had a Christmas wreath up!

*Update: This wreath survived all Summer long and into the Fall! It did start to dry out and crumble just a bit, but I kept gluing it back together to prolong it's life :) Maybe next time I'll use a little more glue and a little more spray paint plus some kind of clear sealer. The pipe insulator does not hold it's shape very well. I would use an actual foam wreath form or add a piece of wire inside the pipe for stability. 

Friday, January 6, 2012

I Love You, a Bushel and a Peck


I could not resist...
When I saw this picture on Pinterest, I just had to replicate it for my wall! This is one of my Grandpa Cavanaugh's all-time favorite and most memorable sayings that he has greeted us with ever since I can remember. It means a lot to me, and I can't believe I had never thought to frame it before!

An old picture frame, some scrapbooking paper, and a sharpie paint pen later, and this is how mine turned out. I just free-handed the letters, so they turned out a little sloppy, but who cares! It's cute :)


Update 1-7-13: I've been thinking, I really should create a cute printable version of this sign! So here you go, an 8x10 image to print and frame. Simply right click on the image and select "save to computer"


Wednesday, November 30, 2011

I Love Felt!

These were super simple and super fun to make.

I started by simply tracing the pattern of an old stocking onto some felt, cut them out and sewed the edges with contrasting thread. I did a really quick, sloppy job of embroidering the names on and added some edging for a little extra detail.