Showing posts with label recipes. Show all posts

Monday, December 2, 2013

Virtual Cookie Exchange + Link-Up!

Thanks for joining us for a {Virtual} Cookie Exchange! We've teamed up with 2 other lovely blogs to whip up some yummy Christmas goodies... AND we want YOU to share your favorites with us!!

Be sure to stop and meet Rachel at Holy Craft and Jessica at The Thriftiness Miss

Have you started any holiday baking yet? Do you enjoy it or find it stressful?
 

When I think Christmas, I think Sugar Cookies


I think Memories
Moments like this with my daughter, 3 years ago...


My mom always made batches and batches of these Christmas cut-outs. Maybe because they always seemed to disappear too fast. Maybe because they freeze so well and can be made months ahead of time. Maybe because they seem to take so much work, it's better just to make enough to last all season in one setting. Whatever the reason, you're going to want to make a lot. We get comments every year about how good these things are. This recipe is actually the doubled version, because we gave up on one batch long ago. Make them and freeze or let them cool and frost before freezing. Keep them in the freezer and take out what you need in small portions. They taste just as good as the moment you made them and un-thaw very quickly.

Sugar Cookies

1 Cup Butter (Softened)
1 Cup Sugar
2 Eggs
1 teaspoon Vanilla
2 3/4 Cups Flour
3/4 teaspoon Salt
1/2 teaspoon Baking Soda
1/2 teaspoon Baking Powder

Mix wet ingredients together well, then slowly add the dry
Chill for 3 hours or overnight
Spread flour on counter and cover rolling pin with flour
Roll out nice and thin - too thick and they will not hold their shape
Cut out shapes using your favorite cookie cutters
Bake at 375 for 8-10 minutes on an ungreased cookie sheet until golden
Makes approximately 2 1/2 dozen

For yummy butter cream frosting: I mix a 1/2 stick of softened butter with confectioners sugar, a tad of vanilla and maybe half a cup of milk. Sorry I don't have the actual recipe on me. I dump sugar and milk together till I get the consistency I want! Then add food coloring.

For an even creamier option, some years I have switched it up and made these:

Sour Cream Cookies

2 Eggs, Beaten
2 Cups Sugar
1 Cup Sour Cream
3/4 Cup Shortening
1 teaspoon Baking Soda
1 teaspoon Lemon Extract
5 Cups Flour

Mix ingredients together well, adding flour last. Roll dough to about 1/4 inch thickness and cut out with cookie cutters. Bake at 350 degrees on an ungreased cookie sheet for 10 to 12 minutes.

Enjoy! 


Now it's your turn. 

What are your favorite cookies to make for Christmas?


Sunday, September 8, 2013

Maui Style Fish Taco Recipe

Have you ever had a fish taco? I went the first 30 years of my life, never having tried one. I honestly thought the concept sounded disgusting. On this last trip to Hawaii, along with Julia and both our husbands, we all decided to be adventurous!


We received numerous recommendations to eat at Leilani's on the beach at Whaler's Village and to try their fish tacos. Supposedly, these were voted "Best Fish Tacos in Maui." Well, if you're going to try a fish taco for the first time, it makes sense to do it in Hawaii! Let me tell ya, they were amazing. To make sure we weren't just blown away because our expectations were really, really low, we had fish tacos again on numerous occasions :)


Of course we decided that eating fresh and healthy on the island was wonderful, and how could we eat more like that at home? Yesterday morning I woke up with a mission to find out what I could about buying fresh fish in Michigan. What I discovered was this; it's not possible. Apparently, there is not a huge market for fishermen on the great lakes any more. Most people out fishing these day are private citizens, fishing for recreation or personal reasons. The very informative man behind the seafood counter at my local, high end market, explained this all thoroughly. He explained that every other store in town does the same thing. They receive a box of frozen fish from Canada, or Panama, or Australia, etc. and take out portions of it to put on display each day. He takes out what he needs for the day in small portions, but many markets un-thaw large amounts and refreeze at the end of the day.


Now, though he said he had heard some really bad stories about Kroger, Meijer and Walmart's fish selection, he highly recommended Costco's selection of bagged, frozen fish. Though he did not deny that buying the bag of frozen fish from Costco was just as good as buying it from him at the counter, I went ahead and purchased 2 pounds of Tilapia from him at 6.99/pound.


Rather than make my own, I purchased this fish taco sauce off the fish counter. It seemed to be a similar recipe to those that are mayonnaise and garlic based. Though homemade is always best, this one tasted pretty good!


The fish we had in Maui was pan-seared and held together in one firm piece, rather than being shredded. The problem with frozen fish is it tends to crumble easily. This however, held together nicely! I was happy to see that it is possible, but may be attributed to buying the fish from the counter vs. bagged??


The fish tacos in Maui met the following general criteria:
  • Flour Tortilla
  • Shredded Cabbage
  • Shredded Cheese (Mozzarella or Monterrey Jack)
  • Finely Chopped Cilantro
  • Firm piece of Mahi-mahi, Tilapia or other white fish (pan-seared with salt and pepper)
  • Sour Cream
Optional:
  • Corn
  • Garlic Cream Sauce
  • Fresh Tomato Salsa
  • Fresh Mango Salsa
  • Rice


That's about it! Yum! I found a recipe for the garlic cream sauce, here.

In the future, I will probably try making these using the frozen fish, but shredding it up and mixing it with corn and maybe rice. I'm interested in experimenting and seeing if I can get away with stretching the fish a little further by mixing it with fillers. Yea, not as good as the original way. But hey, when you're on a tight budget, you do what you can! It's still pretty fresh and healthier than many other meals that come to mind. I hope you enjoy! :)


...Of course, in Hawaii we finished it all off with a piece of hula pie!


Sunday, August 11, 2013

Cup Cake Ice Cream Cones!

When I was little, I remembered having Cake baked in the Ice Cream Cone.  They were so fun.  I finally decided to do it myself! It was so easy. Make the cake batter like normal. Then fill the Ice Cream Cake Cone to a little above where the cone widens. If you go any higher your risk the batter rising above the top of the cone. Bake them at 350 for 15 to 20 minutes until done.


Then, let them cool and ice them!!  I had a good time icing them with different cake decorating tips. You can also just ice them. TIP: Do not make them the day before. I did that and then put them in a tupperware and cones were soggy. If you have to, get them out of the tupperware 8 hrs before the party so the cone has an opportunity to become hard again.

What will our kids remember? ~Julia


Tuesday, July 9, 2013

Coffee, Friends and Cinnamon Bread

Every Monday morning, I pile the kids into our minivan and head over to my sister's house for a time my friends and I call our "reward." The homeschooled kids get some socializing in, while the moms get to load up on coffee, encouragement and very often, some yummy goodness. Last week, Jill had something special cooking in the oven when we all arrived. She was so excited to pull it out of the oven, she could hardly contain the urge to peek inside every 30 seconds!


Come to find out, she had found the recipe on Pinterest for Amish Cinnamon Bread, by no other than Julia's cousin, Melissa over at Redfly Creations! Melissa has guest posted on our site and we love the quality inspiration she publishes on a regular basis. What a small world. The bread was delicious and complimented our coffee and discussion just beautifully.


Friday, January 25, 2013

Use Leftovers for Easy Pizza Bagels

This is a great opportunity to involve your kids in creating meals! One of the easiest crowd pleasers around. We had some extra mini bagels hanging around, and with a quick addition of pizza sauce, mozzarella cheese, and pepperoni you are all set.  I like to add the pepperoni before the cheese so it keeps the cheese from going down the hole. I also prepare it on a cutting board and then place them on the cookie sheet it cuts down on the cheese baked on.  Makes for much easier clean up. 350 degrees for 15 minutes and you're done.


Add a salad for an adult and you will barely see them 
once they are out of the oven. ~Julia

Saturday, January 5, 2013

What Was Your Favorite Christmas Present?

My favorite present was an enamel covered cast iron pot. I decided to give it a try last night and here is what resulted. The great thing about these pots is that you are supposed to do everything in one pot, and you can!!


This is a recipe that I created to fit our family.

Rinse and halve 1 lb. of fresh mushrooms and slice 1 onion. Put your cookware on a large burner on a high setting.  Melt 4 tbsp. of butter and saute mushrooms and onions for 3 minutes.

Remove from pot and set aside. Keep the pot on the burner. Melt the 2 tbsp. butter. Cut beef into 1/4 inch thick stripes and brown on both sides in the pot about 5 minutes. Add cubed potatoes if desired.

Add 1 1/2 cups of beef broth (you can create your own with beef boulion cubes). Bring it to a boil, reduce heat, cover and let is simmer for 40 minutes.

Add mushrooms and onions back in. Cover and simmer for 5 minutes.

Enjoy!!
~Julia

Friday, December 21, 2012

Oatmeal Cookie Granola Recipe


I am a self proclaimed granola snob. I've tried many a recipe over the years before finally perfecting this one. It is THE BEST! Make a batch for Christmas morning or package it and give it as a gift. The best part is, your house will smell heavenly for days afterwards!


Oatmeal Cookie Granola
4 cups Old Fashioned Rolled Oats (NOT Quick Oats)
1/4 cup Brown Sugar, Packed
1/4 teaspoon Salt
1 1/2 teaspoon Cinnamon
1 1/2 teaspoon Nutmeg
6 Tablespoons Butter
1/3 cup Maple Syrup
3 Tablespoons Flour
1/2 cup flax seed or meal if desired
Raisins, Almonds, Dried Cranberries, Or whatever else you like!

*Dairy and gluten free option: Use oil or shortening instead of butter, omit flour and use flax seed.


Directions· Preheat oven to 350 degrees.
· Combine oats, brown sugar, salt, cinnamon, nutmeg, flax and flour in a large bowl.
· In a small saucepan, melt butter and add maple syrup (or melt together in microwave).
· Mix well, and pour over dry mixture. Mix to coat thoroughly, making sure oats are moist enough to stick together and start forming clumps. Spread out on a greased cookie sheet.
· Place into the oven and bake for 20 minutes, until done (make sure not to over-bake depending on the temperature of your oven - granola will appear slightly moist after 20 minutes but will harden as it cools).
· Allow to cool completely, break into pieces, add raisins as desired and store in an airtight container.
*Note: clusters form better if you don't stir at all while baking or while it's cooling.


Wednesday, December 19, 2012

Make-Ahead Christmas Morning Breakfast

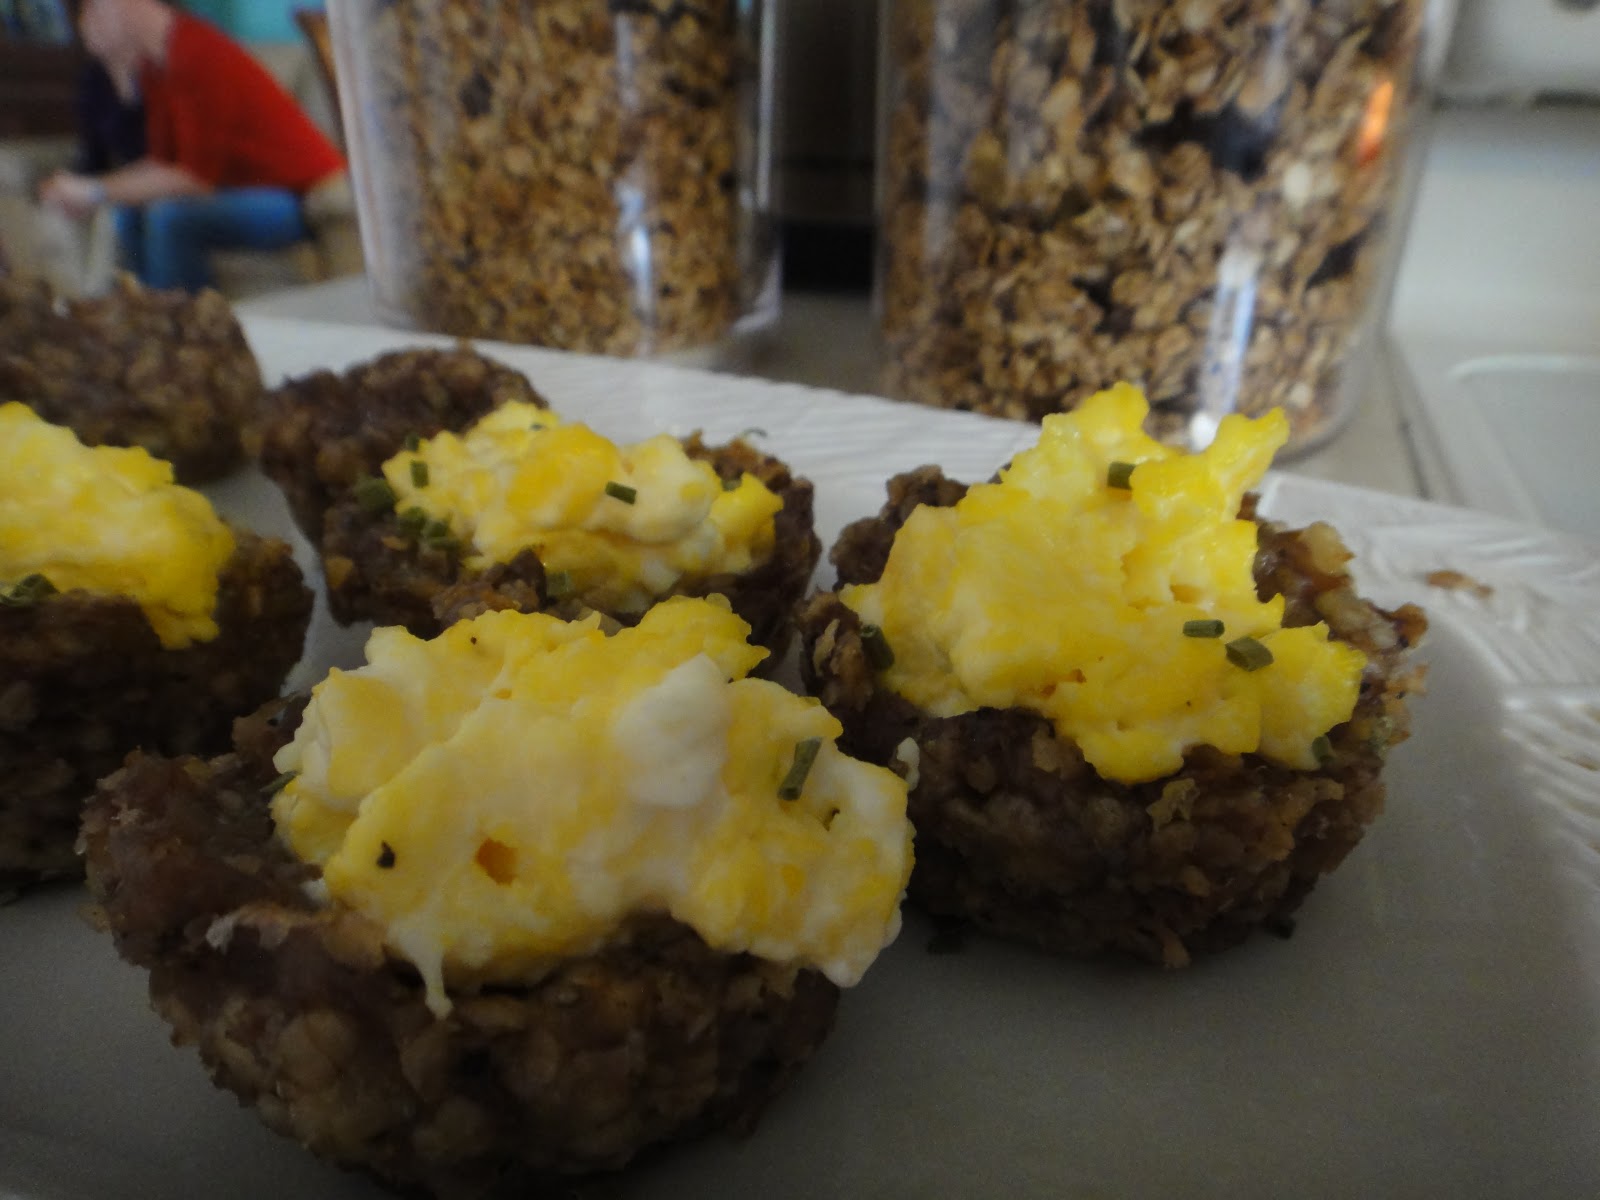
The recipe for these "Rise and Shine" Sausage Oatmeal Cups was ripped out of a magazine in time for the Christmas of 1996. I know this because the coupon for sausage expired in March of '98. Since then, it has been passed around my family and long since became a holiday favorite. Christmas morning breakfast just is not complete without these delicious little sausage cups. They look so impressive, but really come together rather easily. The best part is that you can make the sausage part ahead of time and keep in the fridge or freezer. This year, I will be making them the night before and substituting a little water where the recipe calls for milk. I'll also be omitting the cream cheese to keep this recipe dairy free.


Rise and Shine Sausage Oatmeal Cups
Sausage Cups:
1 lb. Roll sausage (uncooked)
1 T Finely chopped onion
2/3 Cups rolled oats 
1 Egg white
Scant 1/4 cup milk

Filling:
8 Eggs
1/2 Cup soft cream cheese
3/4 Cup fresh chopped and seeded tomatoes or canned diced tomatoes, drained
2 T Snipped fresh chives, dill or green onion tops
Salt and pepper to taste

Preheat oven to 350 degrees F. In a medium bowl, combine the cups ingredients listed above. Divide the mixture evenly into 12 muffin tin cups. Press mixture firmly around the bottom and sides to form hollow cups. Bake 12-15 minutes or until done. Remove from oven, drain cups on paper towels and keep warm. Cups could be frozen or refrigerated at this point. Simple reheat in oven when ready to serve and cook filling.

In large skillet, begin scrambling the eggs. When almost done, fold in remaining ingredients and finish cooking. Divide mixture into the sausage cups and serve hot. 


Tuesday, November 6, 2012

Quick and Easy Chicken Marsala

I've searched the internet for a good copycat Bucca Di Beppo Chicken Marsala recipe. Oh how I love that sweet Marsala goodness! I just recently came across this recipe, but in the mean time, I've kind of come up with a super easy, super satisfying version of my own. My quick and easy version involves skipping out on coating the chicken in flour or any other substance that takes extra steps (bonus: this cuts out calories which will be used up in other areas). I'm just a house wife, with no formal training in the kitchen. But take my word for it, this is good :)

Recipe

  • 1 Pound Boneless, Skinless Chicken Breast (I cut mine into tender size pieces)
  • 1/4 Cup Extra Virgin Olive Oil
  • 1/2 Cup Marsala Wine
  • 1 Cup Mushroom Pieces
  • 1/2 Cup Chopped Red Onion
  • 1/2 Cup Brown Sugar, Packed (yea, I know, but it's sooo good this way! here are the extra calories I was talking about)
  • 1/2 Cup Heavy Cream or Half and Half
These measurements are kind of approximates, as I usually dump stuff together until it tastes right :) Use more or less sugar to taste, and more or less cream depending on how much sauce you want.

In a large skillet, saute onions in the oil. Add chicken, Marsala wine and brown sugar. Cook until chicken is almost done before adding the mushrooms. Stir in cream and simmer until chicken is cooked through and the sauce has thickened. Serve over penne or other pasta of choice. Now that was pretty easy, wasn't it?!

Friday, October 26, 2012

Chicken Tetrazini Once A Month Cooking Recipe


This recipe produced 12 meals $29.20/12 = $2.43 per meal.  This was one of the more expensive meals we did because of all of the soups and sour cream.


Cook and Cube the Chicken. I used a crock pot.

The rest of the ingredients.


All of the ingredients except the pasta mixed together. The first time I did this I made the mistake of not having those ready to go before my pasta was cooked. I became frantic trying to open cans, etc, while my spaghetti was waiting. I had to use oil to keep it from sticking. When the wet ingredients are ready, I just combine as soon as the pasta is done.

Cook the pasta. Do not cook all of it in one batch. It is much more difficult to have it all cook well when you try to do too much in one pot.  I split it in half. I also cooked half whole wheat and half regular.

Start mixing.  Another benefit to keeping the batch separated in 1/2 makes it much easier to stir well.

I keep the two types of pasta separate until I bag.  Then I put 1/2 of each in a pyrex 4 cup measuring cup before I bag it in quart size freezer bags.  You can see a more specific tutorial at this link on Once A Month Cooking Bird's Nest Pie (easy spaghetti).


Chicken Tetrazzini

4 Chicken Breasts (or turkey) cooked and cubed
1 Large can of mushrooms or 8 oz fresh
2 Cans Cream of Chicken Soup
1 Cup Sour Cream
1/2 Pound thin spaghetti, cooked

I multiplied this recipe by four. The recipe called for the mushrooms to be sautéed, but since I used canned I did not end up using butter or sautéing the mushrooms.

~Julia

Tuesday, October 23, 2012

Pumpkin Monkey Bread

Mmmmmm. That's all I've got to say. I pinned this picture on Pinterest a while back and just recently remembered to give it a try. Upon checking out the actual recipe found at this link, I discovered it to be a bit too complicated for my taste. This is not the "tube biscuit" recipe most people will be familiar with, but a made from scratch version. Here is what I came up with, combining the made from scratch version with the traditional tube biscuit recipe. It's super easy and super addicting!

Recipe
  • 2 Tubes of Crescent Roll (or something similar) "tube biscuits"
  • 1 Cup of Pumpkin Puree (canned or fresh)
  • 1 Tbl Cinnamon (or more to taste)
  • 1 Tbl Nutmeg (or more to taste)
  • 1 Stick of Butter
  • 1 Cup Brown Sugar
  • 1/4 Cup Cream Cheese
  • 2 Tbl Confectioners Sugar
Roll dough into quarter size balls. Mix pumpkin puree, cinnamon and nutmeg together. Then, coat dough in mixture: stirring together in a bowl or shaken in a zip lock bag. Place dough mixture in a greased bunt pan. 

Melt butter and mix together with brown sugar. Pour over dough.

Bake at 350 degrees for 30 to 35 minutes until golden and baked all the way through. Let set for 10 minutes, then turn over and remove to a plate.

Soften cream cheese in microwave until it is thin, almost liquefied (roughly 30 seconds). Add confectioners sugar and stir. If mixture is still too thick to pour, add a little milk. Drizzle over bread and serve warm!

Linked Up Here:


Funky Junk Interiors  
Thistlewood Farm Holiday Link Party
Funkyjunkinteriors.net

Wednesday, September 5, 2012

Meal Swap or Once A Month Cooking: Southwest Vegetarian Bake

Yum! This recipe freezes really well and tastes really good when prepared! Here are the steps:
First, I cooked the rice in two batches because my rice maker is too small for 4 cups.

I added some diced tomatoes to the first batch of rice to be sure that it did not stick together.


The Mexicorn should be rinsed and drained.


Combine the rest of the ingredients together.


I chose to use mild salsa because it was going to three other families.


I divided the batches in two, so it was easier to stir.


You must label your bags or else you will forget!!


I used two measuring containers and my canning funnel to fill the bags.  I find that four cups works well for me. That way they are all consistent and not too full.

Here's the Recipe
3/4 Cup brown rice (cook it)
1 can black beans, rinsed and drained
1 can Mexicorn, drained
1 can (10oz) diced tomatoes and green chilies
1 Cup Salsa
1 Cup reduced fat sour cream
1 Cup (4oz) shredded reduced fat cheddar cheese
1/4 tsp pepper
1/2 Cup chopped red onion
1 can sliced ripe olives, drained
1 Cup (4 oz) shredded reduced fat Mexican cheese blend

Directions
Make the rice according to the directions on the package. In a large bowl, combine the beans, Mexicorn, tomatoes, salsa, sour cream, cheddar cheese, pepper, and rice. Transfer to a shallow 2 1/4 quart baking dish coated with nonstick cooking spray. Sprinkle with onion and olives. Bake uncovered at 350 degrees. Sprinkle with Mexican cheese. Bake 5-10 minutes longer or until heated through and cheese is melted. Let stand for 10 minutes before serving.

Nutritional Analysis:
1 Cup equals 284 calories, 10g fat, 7 g fiber, 16 grams protein

I replaced the diced tomatoes and green chilies and just used diced tomatoes to make sure it wasn't too hot for anyone. I omitted the onions and the olives because those are not always popular. I omitted the Mexican cheese. Normally I would use all of those ingredients. Also, if I am not quadruppeling the recipe I still find it to be too much for our family, so I automatically split it and freeze one.